Posting trot is a gait many riders struggle to learn and struggle to do well. It may feel difficult to “stay with the movement” of the horse, or to avoid the feeling of easily being thrown off balance.
We are often taught rising trot with the chant of up, down, up, down, but the actual movement of posting isn’t really about going up and down.
Also, one of the most common pieces of riding advice, “heels down”, when done in the wrong way, can actually make posting much more difficult.
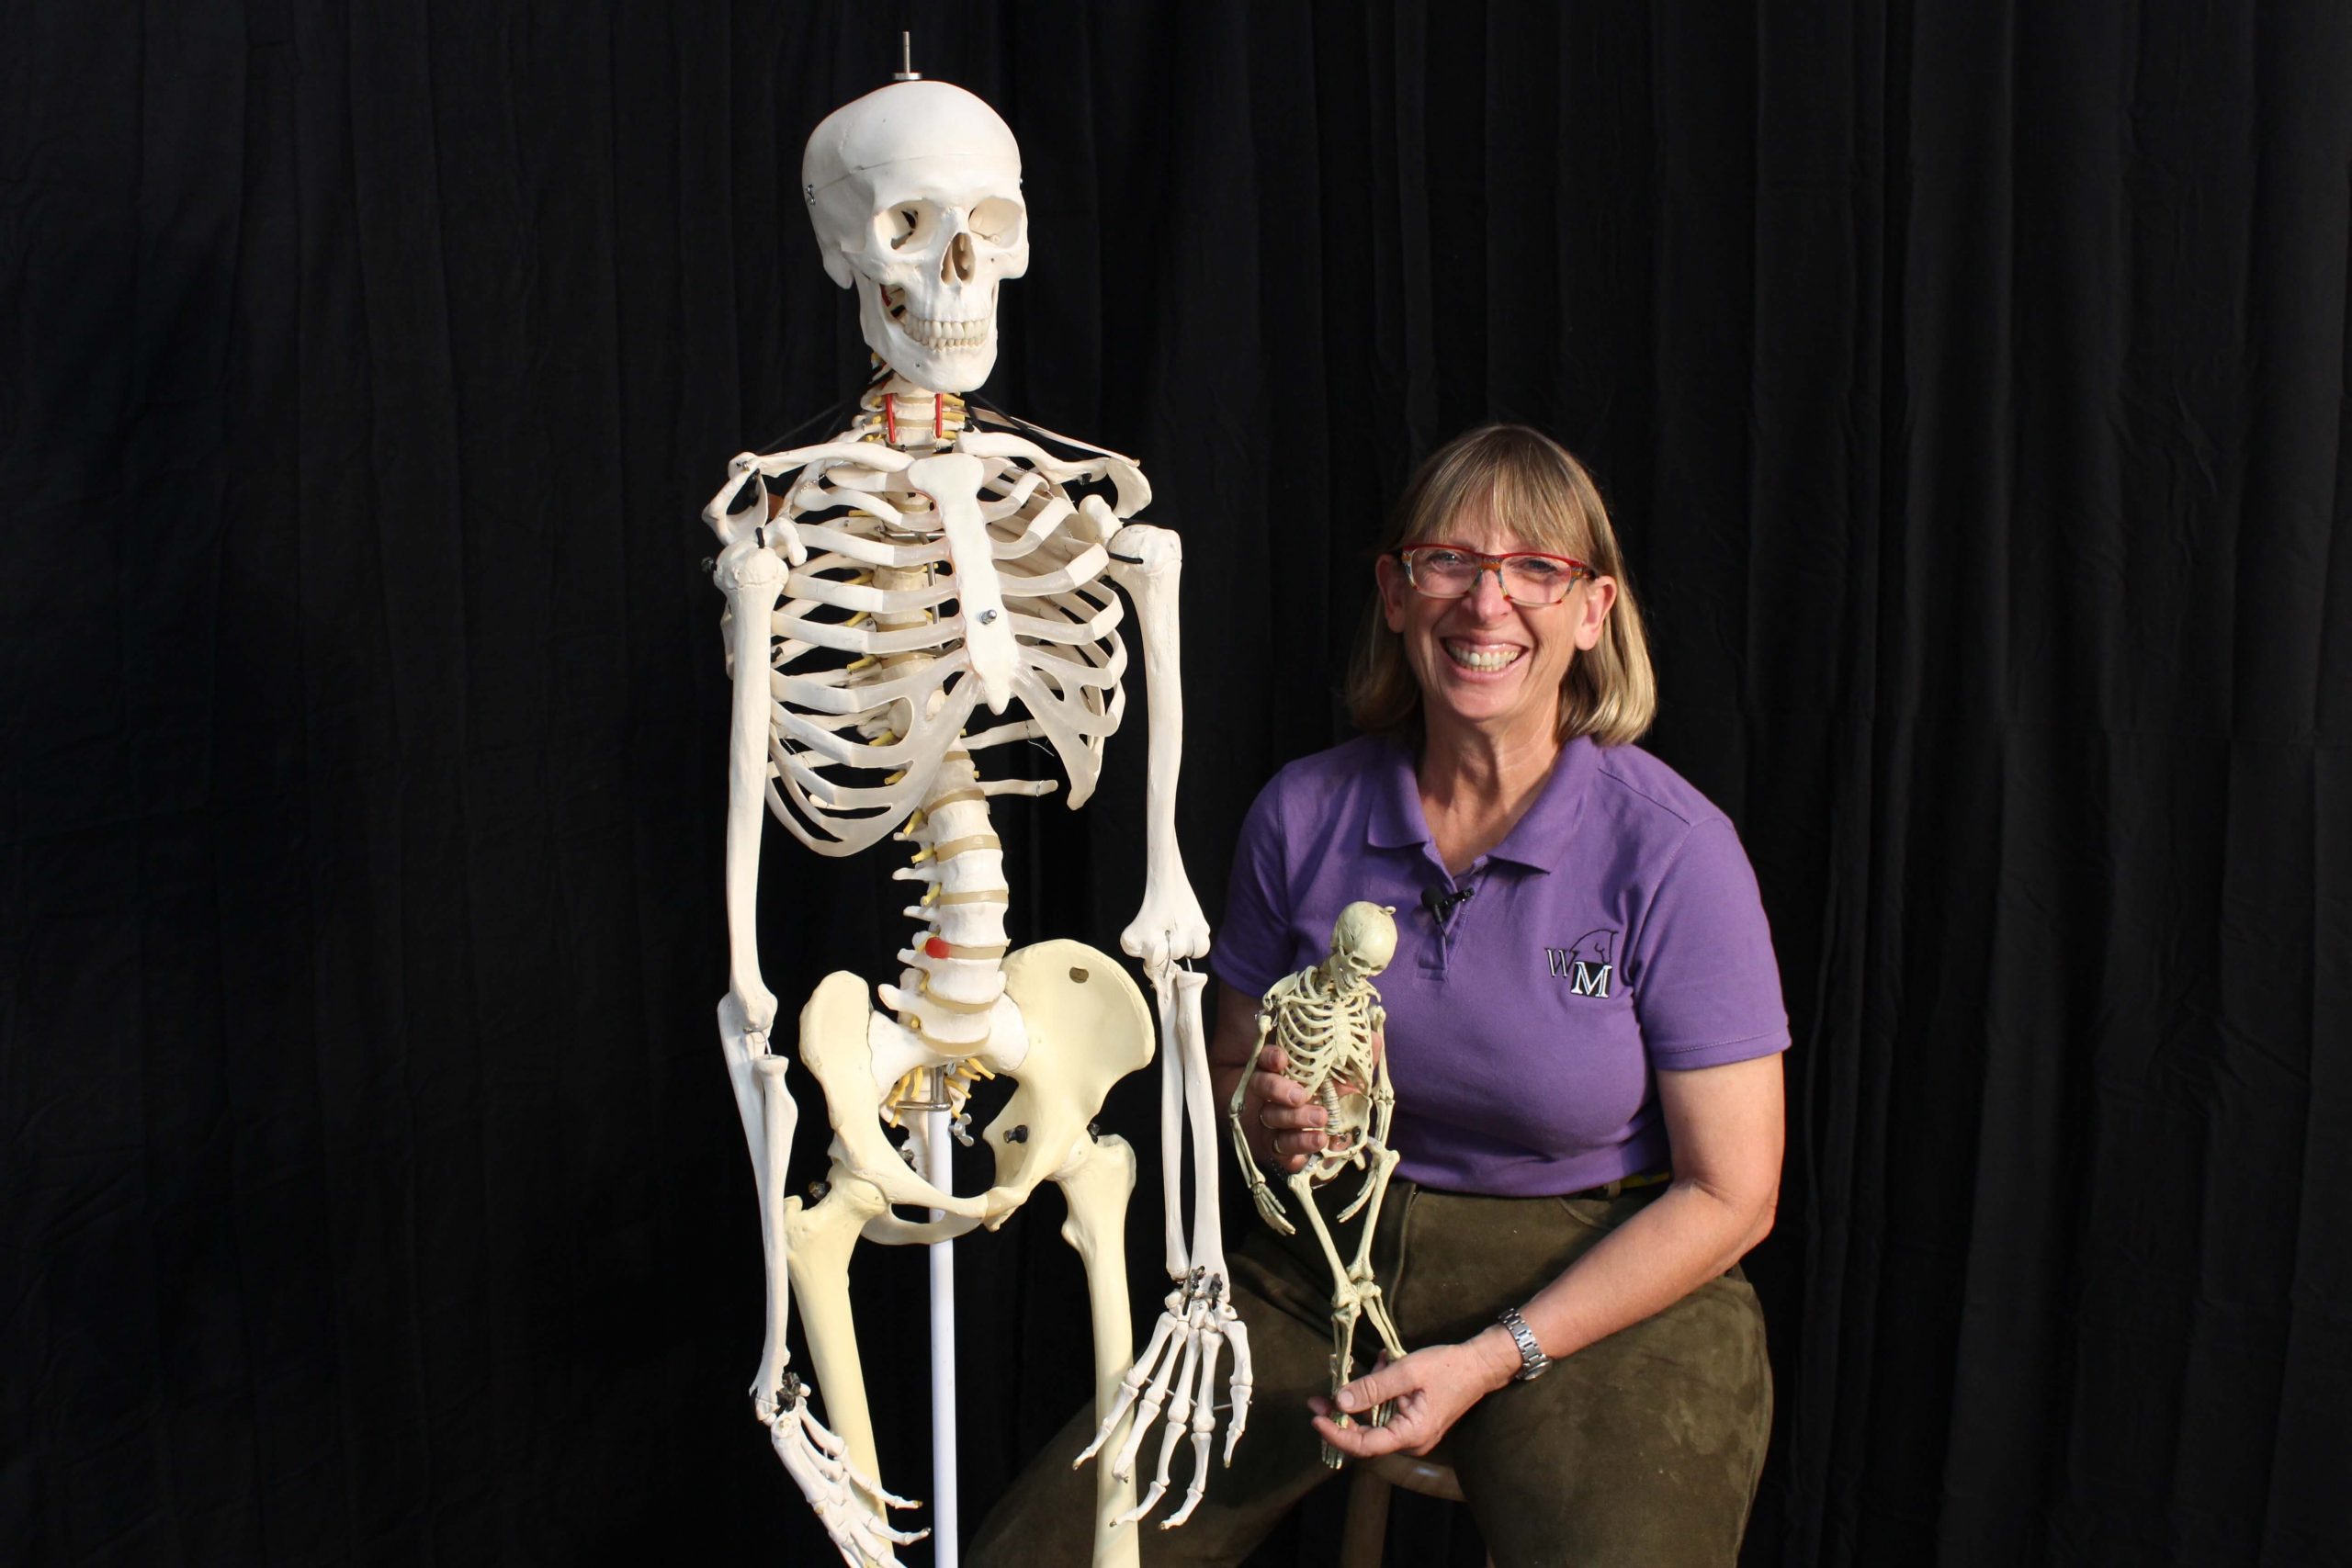
In the video below, Wendy Murdoch shows how to ride an effortless posting trot, using a horse and rider skeleton to show the correct movement.
We’d love to hear from you! How are you going to ride the rising trot differently?
See you in the comments!
Callie


67 Responses
This makes so much sense. I often feel too heavy doing posting trot. Now I know why. Thank you!
Good way to teach the rising trot. Learned posting without stirups and this is the only way, that works 🙂
wow, this explains a lot.. sometimes I sorta “slap” down.. The up/down thought had me confused and sometimes I have trouble “seeing” what the body is supposed to be doing.. The skeleton really helped..
Many thanks,
lee from ohio..
Seeing “just the bones” makes it so much clearer what the differences are between “approaches” to rising trot
very interesting.was suspicious at first but instantly saw the difference.seeing it with the skeleton makes it very clear.thank you .
Interesting seeing just bones – think it would be good to see it ridden on a horse also. Want to see where the weight is being transferred to and from, ie see the whole leg in the picture. Do you think it makes a difference, too, if you’re on a male or female saddle?
I’m a very new rider and this video really confirms what feels most natural on the horse I’ve been riding. When I go with the rhythm and motion of the horse (not an easy thing to learn), the movement feels more integrated. It has taken me a few lessons to grasp this…and I hope I don’t regress and forget it! Love your videos, Callie. Thank you for offering this instruction! Morgana
I can’t wait to try this in the saddle. I’m new to riding and my “instructor” just says do, but doesn’t say how. With the posting trot, my backside “double-taps” the cantle most of the time. Not everytime. This video showed me exactly why, and how to correct it. Thank you so much! Now if the rain would stop I could get back in the saddle.
Love the way this is demonstrated.
Thank you for the information. I am getting back to riding in the english saddle after many years not riding. In the last year I started back just riding occasionally with a western saddle. I know I post exactly as you pointed out (leaning) and need more time back in the saddle to relearn the correct way. I would love to get tips on what exercises I could do off the horse to help me with my rising trot-I think I need to get stronger in order to not be so wobbly. I only ride a couple times a month currently. I realize that I need more time in the saddle but just would love to have some skill building exercises off the horse too.
When will her course start?
Very helpful to see it using a skeleton.
Hi JoAnn, we will be starting Effortless Rider in January 2017!
Love the skeletons and Wendy! I do post back to front as a dressage rider (formerly a hunter/jumper rider) but it took me about a year to understand the importance of proper posting and the coordination to do so. I found it difficult to change the forward leaning that I did when I was jumping. Switching to dressage taught me how to carry myself as to do no harm to my horse’s back by the impact of my weight. Posting back to front has helped me to become lighter in my posting. Not only does my horse push from behind
and not lean on the forehand, but together we have found a rhythm in our trot work which is light and flowing.
Sally Swift, in her book Centered Riding, talks about “riding with your bones.” This video is a great illustration. Thank you.
Terrific video. Would love to see the same for the correct movement for canter.
Helpful uniquely. Thank you. I wish the skeleton’s lower leg was shown all the way to the foot in the iron for the correct, swinging motion, as it was shown for the incorrect motions. I could surmise the position fairly confidently, but it would have been nice to confirm how the ankle and lower leg were positioned during the swing demonstration. Maybe the full program shows all.
Again, Thanks very much.
Your comment is awaiting moderation.
Helpful uniquely. Thank you. I wish the skeleton’s lower leg were shown all the way to the foot in the iron for the correct, swinging motion, as it was shown for the incorrect motions. I could surmise the position fairly confidently, but it would have been nice to confirm how the ankle and lower leg were positioned during the swing demonstration. Maybe the full program shows all.
Again, Thanks very much.
WOW! Seeing it this way really clears up a lot of confusion! No confusion now on the swinging motion! No more up & down for this rider! I cant wait to try this out first thing tomorrow! It’s just so black and white now. Its also SO much easier to keep the image of the skeleton bones in my head than it ever has been with a image of a moving rider in my memory bank! So simple, and generic..but absolutely genius!! I am excited to see more demonstrations like this! You have help more than you will ever know! I give you 5 stars and a zillion thank yous!! YOU ROCK! NO BONES ABOUT IT 🙂
I have to add I ride a Friesian, not the easiest or smoothest horse to post the rising trot! I have found new motivation!!
I agree with Pippa, I think it would be most helpful to see a full leg view when Wendy was showing the correct posture and mechanics. The camera kind of missed it then. Also it would be kind of neat to see either a split screen of a real rider and a skeleton doing the motion simultaneously. But that was very cool, thank you.
I LOVE the idea of a split screen. I actually thought the same thing!!
Terrific idea! I will have to check to see if we can do that in editing for the course.
Excellent description! Although my instructor does chant up, down, up, down, when she first described how to post it was actually the way
Wendy is showing in this video. I guess I would describe it as more of a pelvic thrust (sorry I can’t think of any other words to describe it). In fact, I found it actually difficult to keep heels down when posting like this, so concentrated more on keeping the rhythm rather than heels down. Thanks for the excellent teaching!
Hi Wendy, Calli and everbody, great video. I want to comment about my backache.. I have a herniated lumbar disk. so my quesion is wich is the best way (position) for galloping? couse when I walk and trot my back doesn’t hurt but when I gallop and jump it hurts me…
Hi callie useful video, I swing my pelvis forward , although when I’m coming back down I have a duck butt what am I doing wrong. I would love to have a proper biomechanics rising trot, thanks linda ayrshire scotland
Funny my instructor teaches me to swing at the trot like this. She also tells me to allow my horse to push me up not to push up on my post. Work with my horse not against him.
LOVE LOVE LOVE this video! My trainer and I have been working on rising the trot correctly lately and this goes along right with it!! I love CRK training, it’s my go to site❤️
Got that down…thankfully! My main issue, which is probably odd, but I seem to do the same thing for the canter and gallop. I lose balance as I try to sit both gaits. Can you make the same video for sitting the canter without popping out of the seat? That will be super helpful!
I love this, it was very clear what I have been doing wrong. Thank you for this great video.
Great explanation. Observation – not sure if I’m seeing this or imagining it – it seems like the amount of movement in the upper body is minimal when using the swing motion, especially when compared to the “up/down/up/down”.
Love those skeletons! A helpful visual – thanks for putting it out there.
This is the motion my instructor has encouraged me to use lately to get more forward motion from the horse and it helped. I will practice this swinging technique every time while posting a trot.
I really liked the visual with the skeletons and the thought of swinging with the bottom of your zipper. Thanks.
Will have to try when I am able to ride again. Great advice to help keep me balanced.
Wow. As others have commented, when you see the rising trot from the skeletal view only, it makes complete sense. I’ll have to think about that visual the next time I try trotting.
Love this video! Wendy is awesome and her simplistic demonstration using the basic building blocks–the skeleton–is incredibly helpful. It clears up any confusion, especially when she said to push with the bottom of your zipper. Thank you! I also would love to see sitting the canter and sitting the trot using the skeleton. Very helpful.
Love this video, Callie – thanks so much! As others have mentioned, it’d be great to see the full leg view for the correct rising position.
I’ve noticed that when I sit down after rising, I tend to briefly lose contact with my stirrups (perhaps my weight distribution is wrong and all of my weight goes back into the saddle when I sit?), which changes the position of my foot in the stirrups. I’m constantly trying to make sure my feet don’t slide too far forward but I just can’t seem to get it right! Any tips for this issue?
Hi Jackie, My guess without seeing you is that your legs are likely a bit too far in front. So when you land, as you said, all your weight is going on your seat instead of some weight remaining on the stirrups. Also, try thinking about the up phase of trot, so when you are posting think up, up, up and see if that’s helpful to keep your landing softer
This is exactly how I was taught to do the posting trot. My trainer taught me this way from the beginning, however rather than using my feet to push me up, I tend to allow the movement of the horse to get me up then I put my weight into my knees when rising (rather than on my feet)…is this correct? I found it works for me. Or is this wrong?
Also, I agree with someone who commented above in that it would be interesting to see the skeletal version of the sitting trot and the canter.
Thanks for the wonderful (as always!) video!!
Hi Cat, yes, I think your trainer had a good insight recommending you think of letting weight go into your knees vs heels when posting!
But the problem w this is that for someone with bad knees (like myself), wouldn’t this type of posting injure the knees more? My knees hurt just thinking about it.
Gotta try this. I was never taught this, but I’ll be back to comment on how it goes.
Can you provide more information on “weight in the thighs” and how to achieve that? Doesn’t that need to happen first and then rider is able to post from the zipper? What role do the hamstrings and the adductors play? Thanks!
It’s better to think about function than muscles. There’s no way you can coordinate all the muscles required to rise the trot correctly but you can learn the function and let your brain sort out what muscles you need. The flat of the thigh needs to rest on the saddle. This is a function of the position of the hip in the socket.
When the thigh is correctly positioned and the rider is not braced on the stirrups the weight will automatically transfer to the saddle provided there is contact between the two. That’s because the rider is basically and upside-down “V” shape and the horse is basically a round shape. So the two go together quite easily if the rider is in the correct position. You can see how the skeleton’s thighs is positioned correctly with the flat of the femur toward the saddle.
The exception to this are conformational differences and saddles that do not fill under the rider’s thigh but there are Fixes for that in my 5-Minute Fixes Book.
May I be nit-picky? Allowing for the flesh of the buns and such, it seems to me that your demonstration has the rider too forward in the saddle. With all the saddle fitting we have done, our fitter reminds us the deepest part of the saddle wants to be under your seat for best balance, and it seems as if your rider will be forward still.
I loved how the horse skeleton rolled back in the first bit when the rider was bouncing off the cantle. When we see a “heavy poster” on a horse that tolerates it, we all think, “what a great horse, is he for sale?” I am going to show this to all of my riders in one of our unmounted meetings! I try to tell students, it’s a hip-tip… not up down. At least once they can think beyond bouncing and counting!
I don’t think this will hurt knees more, one should never grip with knees, just distribute the weight down through the leg, using the whole leg from seat to knee (the knee to heel stays relaxed and is for communication only). I hope everyone does dropped stirrup work on safe, steady horses on a line with a good handler and finds the difference between forcing things and allowing the horse to support you out of the saddle. That’s where this concept will come into play the best.
Thank you for a great video. I look forward to more.
Yes, I do think you are being a bit nit-picky here but that’s ok. Elmer has no flesh and his pelvis is in a permanent anterior tilt, he can’t lengthen his back although I dearly wish he could! So if he could sit with his back flat it would change things quite a bit….. but alas!
I am not a big fan of riding without stirrups until the rider has a solid enough lower back position because I see it result in riders learning to grip especially with women. And finding a good steady lunge horse and handler is so hard to find! But yes, the goal is a leg that “drapes” rather than grips or gaps without pressure against the stirrup so that the knees move freely without pain and the lower leg can be used independantly. Thanks for your comment. Glad you liked the video!
From the way it looks, when you swing the pelvis forward, your shoulders go back, which to me looks as if that would put you behind the motion of the horse. It also looks like your back would invert slightly each time, which I would think would end up being hard on your lower back, at least for me as someone with some scoliosis.
Actually riding the rising trot as a swing motion is much EASIER on your back! This is because you are moving from your hips and keeping your lower back stable. Elmer (the human skeleton) has a permanent lordosis (forward curve) of the lower back, approximately the amount you would have when standing. He cannot lengthen his lower back at all so please take this into consideration when watching the video. When sitting, especially when riding, lengthening the lower back decreases the curve decreases slightly, which releases the ilii-femoral ligament (ilio= pelvis, femoral=femur). This ligament is under tension when in standing posture. Its function is to keep the hip firmly into the socket to make standing more efficient and prevent you from falling back from the hip joints. If, as so often seen in most riders, you maintain this standing lower back position (increased lordosis) you restrict your hips making it much more difficult to rise the trot correctly.
As to your point about looking like Elmer is “behind the motion of the horse” what you have to realize is that this horse isn’t moving! If he were Elmer would be swinging upward as the horse pushes off the ground and therefore be with the motion of the horse each stride. The function (moving from the hips with the back flat and solid) is the same but the appearance is quite different because the horse progresses forward with each rising stride. This visual of looking like the rider is leaning back happens also when working on an exercise ball but that’s because the rider’s feet are on the floor. When in the saddle this swing motion puts the rider with the horse’s motion. Notice that the skeleton is moving from the hips and not the lower back as evidenced by the fact that the pelvis does not change position throughout the entire motion. So many riders rise the trot by alternating between anterior and posterior tilt of the pelvis which is really hard on the lower back.
Further explaination about this is in the on-line course. Thanks for your great question!
Wendy,
Thank you for the detailed answer to my question.
The visual was excellent!! I was taught to let the horse’s motion lift me forward and then my job was to sit back down. It sounds like that is what Wendy is saying.
Yes! It’s the horse’s push off the ground that sends you up and you are to let your self down. Glad you liked the visual!
Great short teaser clip !!! I’m a natural tipper with legs swinging back & Scotty has to work hard to balance & maintain rhythm. So hard to break this awful habit.
Definitely have good visual material to work with today. Thank you, as always.
Linda Cox, Australia
Glad you liked it. You are most welcome! I almost made it to Australia this year, I do look forward to going back there one of these days.
A couple of months ago I asked Wendy if she had a video that showed the proper rising trot, and she told me that she did not have one. This video is PERFECT and it is very clear and easy to understand. THANK YOU!
Hi Robert! When you emailed me we hadn’t made this video. I have been thinking about you, so glad you like it! 🙂
Hi Callie,
I have heard that posting helps with balance, even if you are riding a gaited horse. My mare does a stepping pace that is very smooth to ride. When she goes fast or gets too excited she will go into a pace for a few strides and I can get a better feel for the post. I have been riding for a very long time and have never learned to post; however, if it will help with my balance ( which has been compromised somewhat as I am aging) then I’d like to do it. Here’s my problem. Posting on a gaited horse is like trying to post a walk on a nongaited horse. I find it difficult to do a 2 beat exercise on a 4 beat gait. Any suggestions?
I suggest you teach your gaited horse to trot so that she is 4 gaited. I know many top gaited trainers like Larry Whitesell that recommend trotting and cantering gaited horses so this way you can post to the trot!
hi your videos are amazing i have learned lots. I have a horse of my own he’s name is Wildcard but the only trouble is he is stubborn but most of the time he is pretty good.
from Tahlia
You might want to explore SURE FOOT® Equine Stability Program on my website. Many times what we think of as stubborn is rooted in balance or habits. Could be interesting to see how he responds.
Excellent graphic images. Helps to be able to visualize while riding. Suspect kinesthetics may be the final piece of the puzzle for some of us older riders, but the video is great. Thanks, too, for both Callie and Wendy’s generous responses to all the questions.
I think you need to reshoot the “correct” rising trot segment with the lumbars and upper body in neutral spine. Although the current clip shows “the swing”, the rest of the torso is so out of balance that you’ll give people an incorrect view of the dynamic. Also, it would be helpful to be able to see the entire length of the “rider” from foot to head during the “swing motion”. Thanks for putting this together. I think it will be good!
Hi Heidi,
You make a great point – this was a medical skeleton, so it has several abnormalities in the spine there are there on purpose and weren’t able to be corrected into a neutral spine.
It was also kind of tough to stabilize the whole skeleton enough to really get everything accurate, but we wanted to show/focus on the swing from the hip joint.
Thanks for your feedback! Callie
The skeletal video is very helpful. Please help me understand what muscles are used to create the swing motion.
Hi Ruth, think less of the post from being the muscles and more that the motion of the horse is sending you forward and there is a transfer of weight from your seat to your thighs! If we think too much of the muscles then we start to brace in the stirrups, which drives the horse’s back down when we want it to come up.
-Julia Burdy, CRK Training Community Manager
I’m not an expert but taking my awareness to the posas muscle deep in my pelvic bowl where it crosses the hip joint and the insertion into the lesser trochanter helps my posting trot. I don’t contract or do anything just be aware. That along with awareness of the pelvic floor muscles help my wonky left hip. I have hip replacements so I’ve found I need the mind/body connection in order to get the movement patterns. Whatever it does (relax muscles, stabilize bones) works for me because my riding instructor will comment on the improvement during a lesson.
This explains so much of what I was doing wrong and the skeleton really helped. Thank you!!
I was taught the wrong way to post to the trot and have seen many others learn the wrong way. ONCE someone told me the correct way. I have been posting that way ever since.