I always come away from Angelo’s clinics with loads of new information and ideas buzzing in my head and a new excitement for both riding and teaching.
Angelo’s knowledge of horse behavior, fascination with trying new things, and true love of riding are always evident at these clinics. It’s a fun weekend for both participants and auditors, and we always walk away with something new.
There were many highlights to this clinic, but here are the top three I want to share with you.
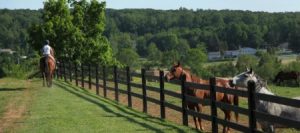
- Two Strategies to Control Spooking While Trail Riding – investigative behavior and shoulder fore
When we are trail riding, our horses will inevitably encounter things they don’t like. Many times we need to go past that thing, whatever it may be. There are two things we can teach our horses that can help in these situations. The first is investigative behavior. This means that we teach the horse to investigate new and scary things. When combined with positive reinforcement, we can create a horse that actually seeks out things to investigate and learns to willingly and quickly complete the investigation process, starting with a raised head and ears pointed forward, to stepping forward towards the scary object, and eventually completing the investigation process by examining the object with the nose and lips.

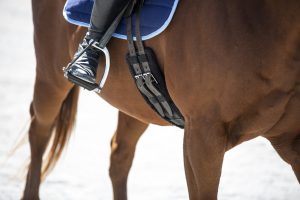
Of course, there are times when the horse may be afraid of something that we can’t actually let them investigate. In these cases, we still need to get past it, and we need to get past it safely. This would be a time to use shoulder fore, by turning the horse’s head away from the object, allowing the neck to bend and the shoulder to come slightly in the direction of the head and neck. In this way, we take the horse’s attention away from the scary thing and maintain control of their feet, even if we are not able to relieve their anxiety about it. The key to having this work is to practice it at other times, so the horse recognizes the cues and the movement and can easily execute the shoulder fore. You don’t want to compound a scary situation by asking for something the horse is completely unfamiliar with. To train the shoulder fore, start along a fence line (such as the long side of the arena), and open your outside hand towards the fence, also apply your outside leg and feel for the horse bending towards the fence and moving with the shoulder slightly to the outside. After you are confident creating and feeling this bending out towards the fence, try it bending inside, then try it going past something scary.

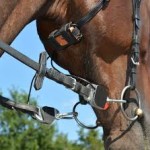
- The Rein Tension Device – measuring the quality of contact
Another highlight from the weekend was trying out the rein tension device – a small tool that connects to each rein and communicates with a laptop to show the pressure in each individual rein and how it changes in the form of a graph. The idea is to measure the quality and correctness of a rider’s contact. The contact should be generally even in both reins, with the amount of pressure staying consistent, showing a clear pressure, release, pressure, release sequence as the horse is being asked for different movements or behaviors.

During the clinic, we used the rein tension device to practice first on the ground, where the “rider” could observe the computer screen and see in real time what their hands were actually doing with the reins. The key to keeping a consistent contact was using the elbows and staying soft and following with the arms, even when pressure was being applied.
On the second day, I rode Bella with the rein tension device, as Angelo coached from behind the laptop, giving me feedback on what I was doing with the reins in terms of pressure and how to change it to make it better. Next, he rode Bella so I could observe the graph created by the rein tension device as he was riding.
Angelo also gave me valuable feedback on Bella’s training and what she needed to learn next to keep progressing, which led me to ask a series of questions about training the young horse – the third highlight I’d like to share with you.
- Training Progression of the Young Horse – Initial Months training both flatwork and jumping, developing balance on the flat and relaxation over fences.
Training a horse correctly takes time and patience. I think many of us have a tendency to hurry, looking to move to the next step before the horse is really solid in the stage we are in.
I wanted to share Angelo’s answer to my question about the correct training of a young horse and when to start jumping… what he described was really a classical progression of training, but viewed through the lens of not only developing the fitness and balance of the horse, but also shaping the horse’s behavior and responses to cues.
The basic concept is that you start with teaching the horse to soften the jaw and stretch the neck when contact is taken, the long and low frame.
Next the horse begins to learn to “sit” meaning the concept of shaping is used to teach the horse to soften the jaw and stretch the neck, but now also step under and lift the back. Tension (or pressure) is now released on the back lifting. This does take some skill on the part of the rider to develop the ability to feel this back lift and soften quickly enough to reward it.
Also at this point in training, the release becomes more subtle because the objective is not to throw away the contact but to develop more of a subtle conversation of signals and responses.
This training is on the flat and develops the horses balance and carriage. The training of the horse over fences can progress at the same time but Angelo described it as being on a “parallel track” to the work on the flat. To teach jumping, the horse is first worked over trot poles, and is allowed to trot over the poles and circle afterwards until they come back to a walk. The goal is to teach the horse to walk after the poles without pulling on the horse to make him walk. Many horses will come off the poles quickly at first but will learn to slow down to a walk after some repetition. Next a small jump is added at the end of the poles and the same sequence is used: trot the poles, jump the small fence, circle if needed, and walk. Next this small jump is raised and eventually a second jump is added afterwards. Each step is repeated until the horse is jumping through the exercise relaxed on a loose rein.

At this point, the training on the flat and over fences are combined, as the horse should now have enough balance to begin working on cantering courses, since he understands how to carry himself, move through his back, and respond to the rider’s signals, as well as where to put his feet and control his body over jumps.
The length of this process obviously varies a lot from horse to horse, some are more naturally balanced with an easy rhythm at the canter and others take longer to develop this. Likewise some horses are natural jumpers while others are not.
When I asked if there was an average time that these initial phases of training should take, Angelo responded that the training on the flat and over fences should come together around 6 months.
I hope you enjoyed these highlights from the May clinic with Angelo Telatin at my farm. Videos from the clinic will be posted in Training Journals – (there will be another opportunity to join at the end of this month) and I am partnering with Angelo to create a new online course. I will have more information soon on both opportunities!
I look foward to your questions and comments!
Callie


3 Responses
Callie~
Angelo’s clinic at your stables was great fun. I too felt energized to ride and to learn more went I left. Thank you for a great day; I look forward to the next clinic.
Nancy
Great read thank you Callie…as always well written and easy to follow.
Thank you so much for your info! It is simple and easy to follow!